Valley Kayaks wire skegs work well and are usually maintenance-free. But my 15-year old VCP Avocet kayak developed
a leak in the skeg system so I had to replace portions of it. In my case the
problem was the small compression fitting (nut/bolt) that attaches the plastic
tubing and skeg wire to the skeg box.
At some point the boat developed a mysterious yet substantial leak
into the rear compartment – perhaps a quart of water after paddling. On dry
land I flipped the boat upside down and poured water into the skeg box from the
hull side, then poked my head into the hatch from below to see what was
happening – water was pouring in where the plastic tubing meets the skeg box - the tubing had pulled free from the metal
compression fitting (see Photo 1). The compression fitting contains a sort of donut-shaped “olive” that deforms when
compressed, thereby squeezing around the outside of the plastic tubing to create a water-tight seal. Unfortunately,
one cannot just push the plastic tubing back into the compression fitting to fix
it. So, having identified the problem I
had a decision to make – do I get some epoxy putty and seal up the plastic tubing
around the metal compression fitting, a messy fix that would make repair in the future difficult – or – do I fix it the proper way with new parts? I decided to fix
it the proper way and sent an email off to Jason at Valley Canoe Products who
sent me replacement parts – including a new brass compression fitting, new skeg
wire, new controller knob, and a plastic tubing splicing kit in case I needed
to make changes to the length of the tubing.
 |
| Photo 1 |
The skeg setup described below is common on Valley boats and
similar enough to other kayaks that I thought it helpful to post some words and
photos explaining how I did this repair.
I wasn’t able to find much in the way of instructions online specific to
my skeg setup, so I mainly just “winged it”.
CLICK photos to ENLARGE:
Terms for reference:
Skeg “Blade”: The plastic fin that goes up/down
Skeg “Wire”: The wire that’s
attached at both ends – at the skeg blade end and up at the control knob
Skeg “Control Knob”: The plastic lever/knob up next to the cockpit
that you push forward/backward with your hand to deploy the skeg (sometimes
called Skeg Slider Knob). This knob has a small set-bolt ("grub screw") inside that holds the skeg wire in place.
Skeg “Compression Fitting”: This is
a 3-part brass nut/bolt setup that for my kayak is made in England, it’s got a
specification in BSP (British Standard Pipe), which is UK plumbing nomenclature
I believe. Sorry I don’t know the spec/size but it’s likely metric.
Skeg wire’s “Plastic Tubing”: The plastic tubing that contains/protects the
skeg wire like a sheath – it’s glued or fiber-glassed inside the boat, runs through the bulkheads,
and extends from the control knob back to the skeg box.
Skeg control knob’s “Metal Rod”:
The roughly 10-inch long hollow metal (or carbon fiber) rod that fits inside
the control knob to provide a rigid piece to slide back/forth. This metal rod has a hole drilled in it
typically half-way along its length to allow the control knob’s set bolt to
pass through fixing the skeg wire in-place.
Skeg “Box”: The fiberglass (or in some cases pre-formed
plastic) box that holds the skeg blade. The skeg box has a small metal post at
the front-end onto which the skeg blade hooks and rotates around. The skeg
box also has an opening at the top inside the boat where the compression
fitting is affixed and where the skeg wire enters to raise/lower the skeg
blade.
1 1. Removing the old skeg wire and control knob
Using
a 2.5 mm Allen wrench (available at any hardware store), unscrew the control
knob set-bolt ("grub screw") to release the skeg wire inside. In
my case, the bolt was stripped - the Allen wrench just turned and turned. So, I was
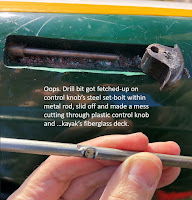
forced to drill out the little bolt, sacrificing the old control knob. TIP:
Use a drill bit specifically made for cutting metal, such as a titanium
drill bit. Otherwise the drill may slide off the little metal bolt, cut through the plastic control knob and straight through the fiberglass deck
of your kayak like butter! (Uh, ask me
how I know…oops. See Photo 2).
 |
| Photo 2 |
Once
the wire is loose at the control knob end, use your hands to pull the skeg blade out/down
to expose the set-bolt that affixes the wire to the blade. If the blade doesn’t pull down easily don’t force it
– this means the bolt in the control knob has not been fully loosened. It’s deceivingly easy, with a bit of elbow-grease, to manually pull out the skeg blade even
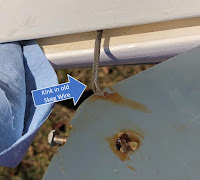
if the wire’s not fully released from the control knob. If the wire's not fully disconnected,
putting leverage on the blade can put a kink (bend) in the skeg wire making it
difficult to re-use. (Uh, ask me how I know…oops. See Photo 3). Once
pulled down, if you must replace the wire, detach it from the skeg blade by
unscrewing the set-bolt there with a flat-head screwdriver. Despite being a 15-year-old boat, this stainless-steel bolt on my Avocet's skeg blade came out fine. Next, pull the skeg wire out completely if you're replacing it. The plastic tubing stays affixed inside the boat - in my kayak the tubing is heavily glassed-in in places. You can also pull
the skeg wire out the front end by the control knob where (in my boat) the plastic tubing
ends with an easy-to-remove cap. (See Photo 4)
 |
| Photo 3 |
 |
| Photo 4 |
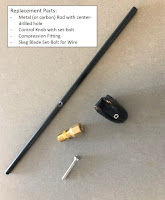
Since
I’d damaged some of the parts when dismantling them, I ordered new parts from Valley.
(See Photo 5). Which they sent to
me free-of-charge, amazing the company is still servicing older boats – their
current skeg system doesn’t even use some of these older parts. Thank you, Valley Canoe Products! Plus, I ordered a replacement for the metal rod
that I’d bent when drilling out the control knob – purchased a new carbon-fiber
version from Tom the owner of TopKayaker in N.H., a uniquely super place that sells
parts for many brands of kayaks.
 |
| Photo 5 |
2. A note about the Control Knob
Not
sure if Valley was the original manufacturer of this type of Control Knob, but
it’s used on many brands of kayaks – see Photo 6. Be aware that some of these knobs are set up for skeg systems
found in composite (fiberglass) kayaks and some are setup for systems typically found in plastic kayaks. In plastic kayaks, the bare skeg wire passes through the smaller
hole (see in Photo 7).
For my kayak, and most composite kayaks, the skeg wire sits inside the
metal rod so both must pass through the larger hole in the control knob. SO, for composite kayaks you must make sure that your replacement control knob has been drilled/threaded to allow the set bolt (seen in Photo 6) to pass all the way through to the larger hole. Otherwise, this little bolt will not be able to reach the skeg wire. The replacement control knob I’d originally received
had not been “tapped” all the way through to this second hole, so was meant for
the plastic kayak setup (#@!%*!?). Instead
of buying a bolt-tapping kit to extend the threads further into the knob, I
just sent off for the proper control knob. (Phew, a lot of words but important
to say all that).
 |
| Photo 6: Control knob, set bolt ("grub screw"), 2.5 mm Allen wrench |
 |
| Photo 7 |
3. Installing the new skeg wire, compression
fitting, control knob, and metal rod
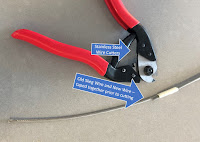
If
you’re replacing the skeg wire, save the original wire and cut the new one to
the same length (taping them together helps – see Photo 8). To do this I
bought some thick-gauge steel wire cutters for $10 online, but West Marine or
any boat store should have even stronger clippers for cutting sailboat rigging,
they’d probably be happy to cut the wire for you. (Good clippers are important - making a clean cut at the ends of the wire
is necessary to smoothly thread it through the plastic tubing, metal
rod, and skeg blade, as described in the steps below.) Thread the new wire into the plastic tubing
from either end, I passed it through the skeg box end. It went very smoothly until it hit something
and stopped – a dent in the tubing perhaps or some debris inside? No way to easily examine the tubing for blockages - since it's glassed-in.
Using the old wire, I reamed out the tubing some, after a long while it finally
went through. (Thankfully)
 |
| Photo 8 |
The
hard part: At this point the new skeg wire is fully inserted in the plastic tubing. Now you must pass the stern end of the skeg wire through
the new compression fitting. As shown in
Photo 9, the compression fitting has three pieces. A lower part that
screws into the skeg box (which has metal threads permanently glassed into it); a middle part which is simply the compression “olive” that is critically
important to have; and an upper part which screws down into the lower part,
thereby compressing the olive. I found
that the space to fiddle with these parts is small and the tolerances for
getting everything to fit are quite limited.
But it’s doable. Once you’ve got the skeg wire through the compression
fitting and sticking out down through the skeg box (see Photo 10), it’s
time to push the stern-end of the plastic tubing through both the upper part of the compression
fitting and through the middle olive part so that the tubing is sticking out some past
the olive (a few millimeters). This is to ensure that the tubing doesn't just pop out again when you're tightening the fitting. Next, use
an 11 mm wrench or monkey wrench to seat the lower part of the compression
fitting into the skeg box. Finally, screw the upper part of the compression fitting onto the lower part until there’s resistance. I
tightened it gradually until I felt some resistance, then went a bit further – hoping
that it was enough to compress the olive around the tubing but not too tight
that it was squeezing the skeg wire inside, which would make the skeg wire hard to move up and down in use. (When the job is finished, you can
test the system on the water, if it leaks tighten the upper part of the compression fitting more).
 |
| Photo 10 |
The
hard part is finished.
Next,
I used my new skeg blade set-bolt to re-attach my old skeg blade to the new
wire. At this stage in the repair, the wire is loose in the system so it’s easy
to just pull some excess down past the skeg box, push the wire into the skeg
blade’s wire attachment hole, and then screw the new set-bolt in to fix the
wire in place. The set
bolt’s head is a bit wider than the width of the skeg blade which sometimes
causes it to catch at the opening of the skeg box or rub on the sides when putting the skeg up/down. You may want to file down the sides of this bolt
to minimize this. The skeg blade can
now be reattached to the boat by hooking it onto the post inside the front
of the skeg box. (See Photo 11).
 |
| Photo 11 |
Next,
push the skeg blade in from the stern to expose the skeg wire at the control knob recess (see Photo 12). Then insert the new metal rod into the control
knob recess from the front – as I said, the plastic tubing is exposed there under the deck, so just pull off the plastic cap and insert the new rod. Then, push the new control knob onto the new
metal rod and line it up over the hole in the metal rod. You can see (Photo 13) that I
pre-assembled the control knob and metal rod to mark-up the location of the set
bolt over the hole in the rod, makes the final step easier. Next,
thread the skeg wire through the metal rod. Use a bungee or second pair of hands to keep the skeg blade fully retracted inside the skeg
box. Then, align the control knob with the
front (“up”) part of the control knob recess, screw down the bolt to affix
the skeg wire at that spot. Replace the
plastic cap on the front end of the plastic tubing (see Photo 2). You’re finished! Wasn’t that easy…..?
 |
| Photo 12 |
 |
| Photo 13 |
By the way, if all you need to do is replace a kinked skeg wire, this site has clear instructions for that: Kayak Academy Skeg Wire Replacement Instructions

