Monday, June 1, 2020

Valley Sea Kayak wire skeg repair – How To Fix, with photos


Valley Kayaks wire skegs work well and are usually maintenance-free.  But my 15-year old VCP Avocet kayak developed a leak in the skeg system so I had to replace portions of it. In my case the problem was the small compression fitting (nut/bolt) that attaches the plastic tubing and skeg wire to the skeg box.

At some point the boat developed a mysterious yet substantial leak into the rear compartment – perhaps a quart of water after paddling. On dry land I flipped the boat upside down and poured water into the skeg box from the hull side, then poked my head into the hatch from below to see what was happening – water was pouring in where the plastic tubing meets the skeg box - the tubing had pulled free from the metal compression fitting (see Photo 1). The compression fitting contains a sort of donut-shaped “olive” that deforms when compressed, thereby squeezing around the outside of the plastic tubing to create a water-tight seal.  Unfortunately, one cannot just push the plastic tubing back into the compression fitting to fix it.   So, having identified the problem I had a decision to make – do I get some epoxy putty and seal up the plastic tubing around the metal compression fitting, a messy fix that would make repair in the future difficult – or – do I fix it the proper way with new parts?  I decided to fix it the proper way and sent an email off to Jason at Valley Canoe Products who sent me replacement parts – including a new brass compression fitting, new skeg wire, new controller knob, and a plastic tubing splicing kit in case I needed to make changes to the length of the tubing. 

Photo 1


The skeg setup described below is common on Valley boats and similar enough to other kayaks that I thought it helpful to post some words and photos explaining how I did this repair.  I wasn’t able to find much in the way of instructions online specific to my skeg setup, so I mainly just “winged it”.  CLICK photos to ENLARGE:

Terms for reference:

Skeg “Blade”:  The plastic fin that goes up/down

Skeg “Wire”: The wire that’s attached at both ends – at the skeg blade end and up at the control knob

Skeg “Control Knob”:  The plastic lever/knob up next to the cockpit that you push forward/backward with your hand to deploy the skeg (sometimes called Skeg Slider Knob). This knob has a small set-bolt ("grub screw") inside that holds the skeg wire in place.

Skeg “Compression Fitting”: This is a 3-part brass nut/bolt setup that for my kayak is made in England, it’s got a specification in BSP (British Standard Pipe), which is UK plumbing nomenclature I believe. Sorry I don’t know the spec/size but it’s likely metric.

Skeg wire’s “Plastic Tubing”:  The plastic tubing that contains/protects the skeg wire like a sheath – it’s glued or fiber-glassed inside the boat, runs through the bulkheads, and extends from the control knob back to the skeg box.

Skeg control knob’s “Metal Rod”: The roughly 10-inch long hollow metal (or carbon fiber) rod that fits inside the control knob to provide a rigid piece to slide back/forth.  This metal rod has a hole drilled in it typically half-way along its length to allow the control knob’s set bolt to pass through fixing the skeg wire in-place.

Skeg “Box”:  The fiberglass (or in some cases pre-formed plastic) box that holds the skeg blade. The skeg box has a small metal post at the front-end onto which the skeg blade hooks and rotates around. The skeg box also has an opening at the top inside the boat where the compression fitting is affixed and where the skeg wire enters to raise/lower the skeg blade.

1   1. Removing the old skeg wire and control knob

Using a 2.5 mm Allen wrench (available at any hardware store), unscrew the control knob set-bolt ("grub screw") to release the skeg wire inside.  In my case, the bolt was stripped - the Allen wrench just turned and turned. So, I was forced to drill out the little bolt, sacrificing the old control knob.  TIP:  Use a drill bit specifically made for cutting metal, such as a titanium drill bit. Otherwise the drill may slide off the little metal bolt, cut through the plastic control knob and straight through the fiberglass deck of your kayak like butter!  (Uh, ask me how I know…oops. See Photo 2). 
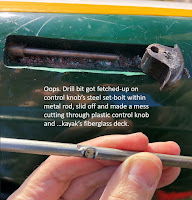
Photo 2


Once the wire is loose at the control knob end, use your hands to pull the skeg blade out/down to expose the set-bolt that affixes the wire to the blade.  If the blade doesn’t pull down easily don’t force it – this means the bolt in the control knob has not been fully loosened.  It’s deceivingly easy, with a bit of elbow-grease, to manually pull out the skeg blade even if the wire’s not fully released from the control knob. If the wire's not fully disconnected, putting leverage on the blade can put a kink (bend) in the skeg wire making it difficult to re-use. (Uh, ask me how I know…oops. See Photo 3). Once pulled down, if you must replace the wire, detach it from the skeg blade by unscrewing the set-bolt there with a flat-head screwdriver.  Despite being a 15-year-old boat, this stainless-steel bolt on my Avocet's skeg blade came out fine. Next, pull the skeg wire out completely if you're replacing it. The plastic tubing stays affixed inside the boat - in my kayak the tubing is heavily glassed-in in places.  You can also pull the skeg wire out the front end by the control knob where (in my boat) the plastic tubing ends with an easy-to-remove cap. (See Photo 4)
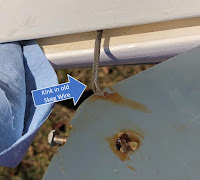
Photo 3
Photo 4


Since I’d damaged some of the parts when dismantling them, I ordered new parts from Valley. (See Photo 5).  Which they sent to me free-of-charge, amazing the company is still servicing older boats – their current skeg system doesn’t even use some of these older parts.  Thank you, Valley Canoe Products!  Plus, I ordered a replacement for the metal rod that I’d bent when drilling out the control knob – purchased a new carbon-fiber version from Tom the owner of TopKayaker in N.H., a uniquely super place that sells parts for many brands of kayaks.
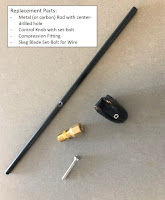
Photo 5


      2. A note about the Control Knob

Not sure if Valley was the original manufacturer of this type of Control Knob, but it’s used on many brands of kayaks – see Photo 6.  Be aware that some of these knobs are set up for skeg systems found in composite (fiberglass) kayaks and some are setup for systems typically found in plastic kayaks.  In plastic kayaks, the bare skeg wire passes through the smaller hole (see in Photo 7).  For my kayak, and most composite kayaks, the skeg wire sits inside the metal rod so both must pass through the larger hole in the control knob. SO, for composite kayaks you must make sure that your replacement control knob has been drilled/threaded to allow the set bolt (seen in Photo 6) to pass all the way through to the larger hole. Otherwise, this little bolt will not be able to reach the skeg wire.  The replacement control knob I’d originally received had not been “tapped” all the way through to this second hole, so was meant for the plastic kayak setup (#@!%*!?).  Instead of buying a bolt-tapping kit to extend the threads further into the knob, I just sent off for the proper control knob. (Phew, a lot of words but important to say all that).

Photo 6: Control knob, set bolt ("grub screw"), 2.5 mm Allen wrench
Photo 7


      3.  Installing the new skeg wire, compression fitting, control knob, and metal rod

If you’re replacing the skeg wire, save the original wire and cut the new one to the same length (taping them together helps – see Photo 8). To do this I bought some thick-gauge steel wire cutters for $10 online, but West Marine or any boat store should have even stronger clippers for cutting sailboat rigging, they’d probably be happy to cut the wire for you.  (Good clippers are important - making a clean cut at the ends of the wire is necessary to smoothly thread it through the plastic tubing, metal rod, and skeg blade, as described in the steps below.) Thread the new wire into the plastic tubing from either end, I passed it through the skeg box end.  It went very smoothly until it hit something and stopped – a dent in the tubing perhaps or some debris inside?  No way to easily examine the tubing for blockages - since it's glassed-in.  Using the old wire, I reamed out the tubing some, after a long while it finally went through. (Thankfully)
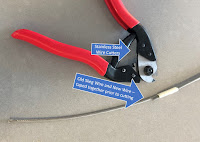
Photo 8


The hard part: At this point the new skeg wire is fully inserted in the plastic tubing.  Now you must pass the stern end of the skeg wire through the new compression fitting.  As shown in Photo 9, the compression fitting has three pieces. A lower part that screws into the skeg box (which has metal threads permanently glassed into it); a middle part which is simply the compression “olive” that is critically important to have; and an upper part which screws down into the lower part, thereby compressing the olive.   I found that the space to fiddle with these parts is small and the tolerances for getting everything to fit are quite limited.  But it’s doable. Once you’ve got the skeg wire through the compression fitting and sticking out down through the skeg box (see Photo 10), it’s time to push the stern-end of the plastic tubing through both the upper part of the compression fitting and through the middle olive part so that the tubing is sticking out some past the olive (a few millimeters). This is to ensure that the tubing doesn't just pop out again when you're tightening the fitting.  Next, use an 11 mm wrench or monkey wrench to seat the lower part of the compression fitting into the skeg box. Finally, screw the upper part of the compression fitting onto the lower part until there’s resistance.  I tightened it gradually until I felt some resistance, then went a bit further – hoping that it was enough to compress the olive around the tubing but not too tight that it was squeezing the skeg wire inside, which would make the skeg wire hard to move up and down in use.  (When the job is finished, you can test the system on the water, if it leaks tighten the upper part of the compression fitting more).

Photo 9


Photo 10


The hard part is finished.  

Next, I used my new skeg blade set-bolt to re-attach my old skeg blade to the new wire. At this stage in the repair, the wire is loose in the system so it’s easy to just pull some excess down past the skeg box, push the wire into the skeg blade’s wire attachment hole, and then screw the new set-bolt in to fix the wire in place.  The set bolt’s head is a bit wider than the width of the skeg blade which sometimes causes it to catch at the opening of the skeg box or rub on the sides when putting the skeg up/down.  You may want to file down the sides of this bolt to minimize this.  The skeg blade can now be reattached to the boat by hooking it onto the post inside the front of the skeg box. (See Photo 11).

Photo 11


Next, push the skeg blade in from the stern to expose the skeg wire at the control knob recess (see Photo 12).  Then insert the new metal rod into the control knob recess from the front – as I said, the plastic tubing is exposed there under the deck, so just pull off the plastic cap and insert the new rod.   Then, push the new control knob onto the new metal rod and line it up over the hole in the metal rod.  You can see (Photo 13) that I pre-assembled the control knob and metal rod to mark-up the location of the set bolt over the hole in the rod, makes the final step easier.  Next, thread the skeg wire through the metal rod.  Use a bungee or second pair of hands to keep the skeg blade fully retracted inside the skeg box.  Then, align the control knob with the front (“up”) part of the control knob recess, screw down the bolt to affix the skeg wire at that spot.  Replace the plastic cap on the front end of the plastic tubing (see Photo 2).  You’re finished!  Wasn’t that easy…..?

Photo 12
Photo 13


By the way, if all you need to do is replace a kinked skeg wire, this site has clear instructions for that:  Kayak Academy Skeg Wire Replacement Instructions

Tuesday, March 31, 2020

Plastic Shrink-Wrapping Boats for Winter Storage – Adverse Effects on Environment


Plastic shrink-wrap on a plastic kayak…really? (see photo). When people start covering cheap-plastic with more plastic, it’s surely a sign that shrink-wrapping is getting out of hand!  

UNBELIEVABLE!?  Plastic shrink-wrap winter storage layer over a cheap, plastic recreational kayak (“banana-boat” type kayak).   What a waste….  (City of Rye NY Municipal Boat Basin, March 26, 2020)

Covering boats with heat-shrink LDPE (low-density polyethylene) film for winter storage has caught on quickly in recent years – now it seems every boat in the marina is shrink-wrapped. The mountain of plastic waste this generates every season is scandalous. But is shrink-wrapping boats for winter storage even necessary?  I did a little research on the topic and consolidated what I found below.

   1. The Problem:

The overarching problem of plastic waste is a huge issue having larger societal and ecological consequences.  This blog post here is focused solely on the issue of boat shrink-wrap plastic.  At present, most of this shrink-wrap material is sent to landfills or is incinerated. It is made from LDPE, combined with additives to provide UV resistance and other properties. As discussed below, very little of this material is recycled. The average boat requires 15 lbs of shrink-wrap each season, multiplied by the 13 million registered boats in the United States it’s easy to see how disposal of shrink wrap could cause a landfill crisis. (1)  Incineration of LDPE and other plastics causes its own problems – principally the release of heavy metals, organic pollutants, and other toxins into the air and in incinerator ash residue, which itself must be landfilled. (2) And lastly, plastic constitutes the predominant form of marine debris. (3)  As kayakers, we all see more and more plastic (including boat-wrap) littering the shores.


 2. Is Shrink-Wrapping Boats Even Necessary?:

Retailers and manufacturers of boat shrink-wrap say the protective film is necessary to keep rain/snow out of your boat and to minimize UV sun damage when the boat is in storage for the winter. If you dig deeper though, you’ll find that this isn’t the whole story.

Firstly, the cost of wrapping your boat annually is not cheap. I’ve seen local prices range from $15-25 per foot – starting at $450 flat rate for boats 25’ or under. That’s every year.  By comparison, a well-maintained canvas cover can last 20 years and many are made from cotton duck fabric so are ultimately biodegradable. Though more expensive to purchase initially (roughly 2x/3x cost of disposable LDPE wrap), the extra up-front cost of a canvas boat cover can be quickly recouped in just a few years. (4, 5)

After reading many online sources, it appears shrink-wrapping your boat may actually be worse than doing nothing when it comes to mold. The sun’s radiation will heat up any water trapped on/in the boat beneath the plastic wrap cover.  Temperatures under the cover will swing up by day causing evaporation (increased humidity) and drop down at night causing condensation. The result – MOLD. Now you’ve got another problem so must use fungicides or other mold-preventives (sprays, heaters, desiccants, etc.). (6)    Alternatives, like keeping a boat under a more open/breathable cover (like canvas) or under the roof of a garage can provide more air-flow and prevent humidity and mold problems.

Another alternative to shrink-wrap is to have no cover at all. (How's that for a concept). UV damage can be minimized by spraying a UV protectant (303 etc.) on rubber parts a few times in the off-season and by applying a protective coating of wax on the hull before storage. If that’s too much work, then do nothing – wait until the boat's finish fades then polish/restore any oxidized gelcoat once every 20 years – remember, gelcoat has UV inhibitors in it so resists oxidation!   Isn’t restoring a boat hull with some polish and a power buffer once every 20 years a better solution than adding 300 lbs of plastic waste to landfills (15 lbs/year x 20 years)?


     3. Recycling:

While better than landfilling, recycling LDPE shrink wrap is a mixed bag.

The EPA estimates that only 6.2% of LDPE (recycling number 4) is recycled in the United States. (7) That’s for LDPE overall – most of which is the rigid kind, used in food containers, etc. The plastic film type of LDPE is the material used in plastic grocery bags and is also the class of plastic used for shrink-wrap boat covers. Recycling of these thin, flexible LDPE films presents added difficulties over the more rigid type. These films must be separated from the general plastic recycling waste stream because they require special machines that will not become clogged during the milling process. Also, LDPE films are often contaminated (dirty) and must be cleaned before they can be recycled, adding  time and energy to the process, and accounting for the very low percentage of LDPE recycling worldwide. (8) 

Even if recycled, LDPE plastic is not “closed-loop” recycling. That is, it cannot be recycled into the same product, over and over. It is “recycled”, or more accurately “converted”, into a different final-use product, like composite lumber or carpet material. (9) This is partly due to the additives in plastic – UV inhibitors, flame retardants, coloring agents, etc. – that act as contaminants and prevent it from being reused in the same form.  Also, plastic can only be recycled a few times before its quality decreases to the point where it can no longer be used. Typically additional virgin material is added during the recycling process in order to “upgrade” the quality of the plastic. (10, 11)  

By comparison, aluminum and glass are “closed-loop” recyclable materials – they can be made over-and-over into new bottles and cans without losing quality or purity. Unlike plastic recycling, there’s no need to add virgin material in the glass/aluminum recycling process. (12)  As an aside, I’ve personally tried to eliminate all single-use plastic – bottles, bags, cutlery, etc. – and only use aluminum cans when buying beverages and fabric grocery bags when shopping, surprisingly easy things to do.

At present the cost of boat shrink-wrap disposal is largely borne by taxpayers in the form of garbage hauling, landfilling, etc. While some businesses offer prepaid shipping bags that can be used to send boat shrink wrap in the mail for recycling (“Dr. Shrink” sells a prepaid shipping bag for $50), a marina-based collection/hauling operation is clearly preferred to reduce costs and to avoid the need for additional materials to wrap/mail the waste! (4, 13)  Westchester County’s Boat Wrap Recycling program collects boat-wrap if your marina participates. (14)  Now, whether “recycled” boat wrap plastic is ultimately processed into recycled products depends on the status of the world’s recycling market at the time it is collected.  If the market is uneconomical (as it is now for many plastics), this material will be landfilled or burned... (15)  Some have advocated for an upfront “product stewardship” deposit to address the full cost of plastic boat wrap over its life cycle, thereby shifting recycling costs from municipalities to the consumers who directly benefit from the product. No such regulations currently exist in New York that I’m aware of.

So that’s it – something to think about and something for boaters to work towards eliminating if possible.  It should be noted that many kayaks are also made from LDPE and should also be recycled when their useful life has ended. And perhaps old fiberglass boats can be milled into fibers and reused.  In my view, the difference between the plastic/fiberglass material used to make boats themselves and the plastic shrink-wrap used to cover them is that shrink-wrap covers are essentially single-use items for which there are alternatives. 

For more - check out this recent PBS documentary, Frontline: Plastic Wars, which delves into the conundrum of recycling plastic:  https://www.pbs.org/wgbh/frontline/film/plastic-wars/

References:
1: https://www.boattrader.com/resources/shrink-wrap-recycling-easier-think/
2: http://theconversation.com/why-municipal-waste-to-energy-incineration-is-not-the-answer-to-nzs-plastic-waste-crisis-126824
6: https://tomdwelsh.com/2015/10/08/shrink-wrap-boat-storage-dangers-and-long-term-effects/
7: https://millerrecycling.com/ldpe-out-of-landfills
8: https://www.plasticexpert.co.uk/plastic-recycling/ldpe-recycling-plastic/
9: https://www.dec.ny.gov/chemical/8817.html
11: https://www.sciencedirect.com/science/article/pii/S030438941730763X
15: https://environment.westchestergov.com/residents/212-news-events/2582-boat-wrap-recycling-expands-to-hudson


Tuesday, March 10, 2020

Edging a Sea Kayak When Surfing - with Illustrations

One of my “Aha!” moments when learning to surf waves in a sea kayak was the realization that edging on the same side as your paddle during a stern rudder stroke is less effective (actually ineffective) in turning the boat.

As a kayak catches a wave and begins to move forward and "plane" on that wave, the bow will invariably begin to turn one way or the other. Without correcting this the kayak will eventually broach resulting in a side-surf or coming off the wave (wave passes underneath).  Using the stern rudder stroke and edging the kayak is necessary to get the kayak back on track when surfing.

Under regular paddling (non-surfing), the typical way to improve the effectiveness of a stern rudder stroke is to edge the kayak on the same side that you placed the paddle. [e.g., To Turn Left - Rudder On Left Side - Edge on Left Side].  Edging this way on the stroke-side is more natural for the body and quickens the turn by shortening the kayak’s waterline length. Doing it this way also allows for a quick transition to a low brace turn.

However, edging on the paddle side won’t work when surfing if your intent is to stay on the wave. If you edge on the same side as your paddle in the stern rudder stroke, two bad things happen: First, your edge will present more of the boat’s hull to the wave face - the flat underside portion of the hull in contact with the wave. This will increase the rotational force that has already begun to turn the kayak into a broach. (badSecond, the chine portion of the kayak hull has a curve to it from bow-to-stern, that will naturally act to turn the boat to the left when edged on the right and vice-versa.  Using this natural tendency of the hull to turn away from the side it's edged on is super helpful when fighting the broach. But if you edge on your paddle side you'll be edging on the down-slope side of the wave, and the curve of the kayak hull will very rapidly accelerate the broach that has begun. (bad)

So, edging the kayak on the OPPOSITE side from your paddle during a stern rudder stroke when surfing is much more effective in keeping the boat running straight and on the wave. It provides a double-whammy - the paddle and the edging work together. As your kayak begins to turn or broach, put the stern rudder stroke in on the down-wave side (trough side) but edge on the up-wave side (crest or peak side).   NOTE, doing it this way can be challenging to execute without practice. You may feel off-balance and unstable at first – your mind is telling you, “Don’t do that, if I edge on the side without a paddle I won’t have any support!?”  You must ignore that warning message from your brain, curl your torso/head away from the edge side to stay balanced (it's an "edge" after all, not a "lean"), and keep the paddle blade in the water.  Try it on some small waves at first to build muscle-memory.

I’ve done my best to sketch some illustrations of this (below) that I hope are clear enough.

Stern Rudder Stroke - Viewed from Stern

CLICK TO ENLARGE
Old grainy photo of mine taken while surfing, pre-smartphone etc.
CLICK TO ENLARGE

CLICK TO ENLARGE


Wednesday, March 4, 2020

"Commando" Sea Kayak Launch Sites Map - Westchester and Fairfield Counties


WATER ACCESS POINTS FOR PADDLING (or lack thereof)...

LAUNCH SITES MAP - just places I've put my sea kayak in Long Island Sound over the years, in Westchester County NY and Fairfield County CT, beginning in the early 90's when "commando-launching" for solo paddling (not in groups) was perhaps easier to do. I was only stopped from launching a few times - usually easy to jump in the water and zoom off when solo. Launch spots on this map (LINK TO MAP) mainly for fun to show, not places I personally "sanction" or officially recommend. Enjoy.

Actual sign at Flint Park, Larchmont NY... :-( 


Other great resources for launch sites in Westchester and Connecticut are maps/lists from KALM and CONNYAK, links below. And additionally a great one from SKSA for Long Island kayak launch sites:

KALM Launch Sites

CONNYAK Launch Sites

SKSA Launch Sites