Background - before I got the Hullavator:
If you paddle solo a lot, some method of assisting you with loading your kayak onto your car is nice - and potentially essential depending on your level of fitness. I used to carry my heavy British kayaks over one shoulder and hoist them onto my car solo using just my outstretched arms. Not surprisingly, after perhaps a decade of that I began looking for an alternative! I first found Yakima's "Boatloader" - a great product that's simply a bar that extends from your rack. I used that for a long time - you first lift the bow onto the bar and then raise the stern onto the rear saddle - greatly reduces the effort of lifting the boat since you do it in stages. One downside to the Boatloader is the potential for your kayak to slide off the cradles if they're slippery, or in high winds. (I've got a post about this elsewhere on this blog.)
The Hullavator:
But if you need a little MORE help, then the Thule Hullavator is the load-assist kayak carrier to buy. I finally bought the Hullavator after a shoulder injury. I personally had no choice at that stage. But in retrospect it would have been nice to have a Hullavator sooner, and I definitely recommend the product. The main upsides to the Hullavator include: ease of raising the boat onto the roof (you can really just lift it with one arm); the boat is secured before it's on the roof (won't slide/blow off before you strap it down); and it provides the ability to easily work on the boat when it's in the "down" position - sponge-out water, remove hatches, fix a bungee, adjust footpegs. It's right at waist height so easy to do all that.
 |
| So easy to access the cockpit/hatches, no standing in doorwells |
The downsides to the Hullavator are worth knowing before you buy. Some, but not all, can be overcome as discussed below. The downsides include:
- You have to lift the full boat weight to chest height to load it onto the Hullavator.
- You must simultaneously (yes) squeeze the hand grips to unlock the hullavator in order to raise the boat - this is not easy if you've got any knee/back/shoulder issues. See TIP below.
- When you lower the boat, the swing-arms OFTEN don't fully lock (unless you check to make sure) - meaning the arms will swing up violently when you remove the boat.
- The cradles don't fold down, so if you must enter a low garage you have to remove the Hullavators - and they're pretty heavy.
- If you use Yakima (round) bars, the Hullavator arms tend to rotate when you load your kayak, so you must first realign the two arms before cinching your boat straps tight. Otherwise you won't be able to raise it.
- Road noise - the rack makes more noise (wind at high speeds, squeaking at low speeds) than other racks.
Ways to overcome some of these downsides:
1. People who have used the Yakima Boatloader, Thule Outrigger, or any of the similar load-assist kayak carriers that allow sliding the boat up from behind (Hully Rollers, Roll Model) are accustomed to lifting just 50% of their boat's weight at a time from ground level - first the bow is lifted up to the bar (or rear cradle in rear-loading methods) then the stern in a second step. These load-assist products make a major difference in effort when solo-loading. And are a perfect combination to use with a rolling kayak cart. Unfortunately, unlike these other load-assist carriers, the Hullavator requires that you lift the entire boat's weight at once - why? Because lifting the bow into the rear Hullavator cradle and sliding it forward is not officially sanctioned (I called Thule) due to the potential for damaging the hydraulic arms with repeated use. The arms are not meant to be torqued sideways - only opened/closed up and down. This inability to load the boat in a two-step fashion is far and away the biggest downside to the Hullavator. If you have no trouble dead-lifting a 60-lb kayak from the ground with the cockpit facing towards you (which is necessary to "properly" load a kayak onto the Hullavator cradles), then chances are you don't need the Hullavator in the first place! (Not sure what Thule was thinking there.) Nevertheless, despite the non-orthodox nature of this method, what I do is put the bow in the rear cradle, then lift the stern, followed by a combination lift/slide, shimmying the boat forward until the cockpit is between the two arms. Then I strap it down. When "slide-lifting" the boat along the cradles, I try not to put too much sideways pressure on the arms. This is actually one advantage to having round Yakima bars, it allows the Hullavator arms to rotate a bit during the "slide-shimmy", which probably reduces the forces on the joints of the arms. The arms will be misaligned afterward, but I fix that before securing the straps. With my heavier boat, I sometimes lift the stern into one of my Talic portable kayak stands so I can work the boat forward into the Hullavator. But any way you cut it, lifting the whole boat or a semi-slide method, with the Hullavator you end up lifting more of the boat's weight than with the other load-assist carriers that allow separate bow-then-stern loading. The saving grace is you only have to lift the boat to chest height with the Hullavator. Because you don't have to lift anything above your head, overall the Hullavator is an improvement in terms of effort as compared to other load-assist carriers in my opinion - especially if saving your shoulders is your goal. But clearly the Hullavator could be improved - Thule should work on modifying the Hullavator to allow step-wise loading from the ground. Perhaps reshape the rear cradle to facilitate sliding and put a crossbar or something to prevent torqueing the arms (?).
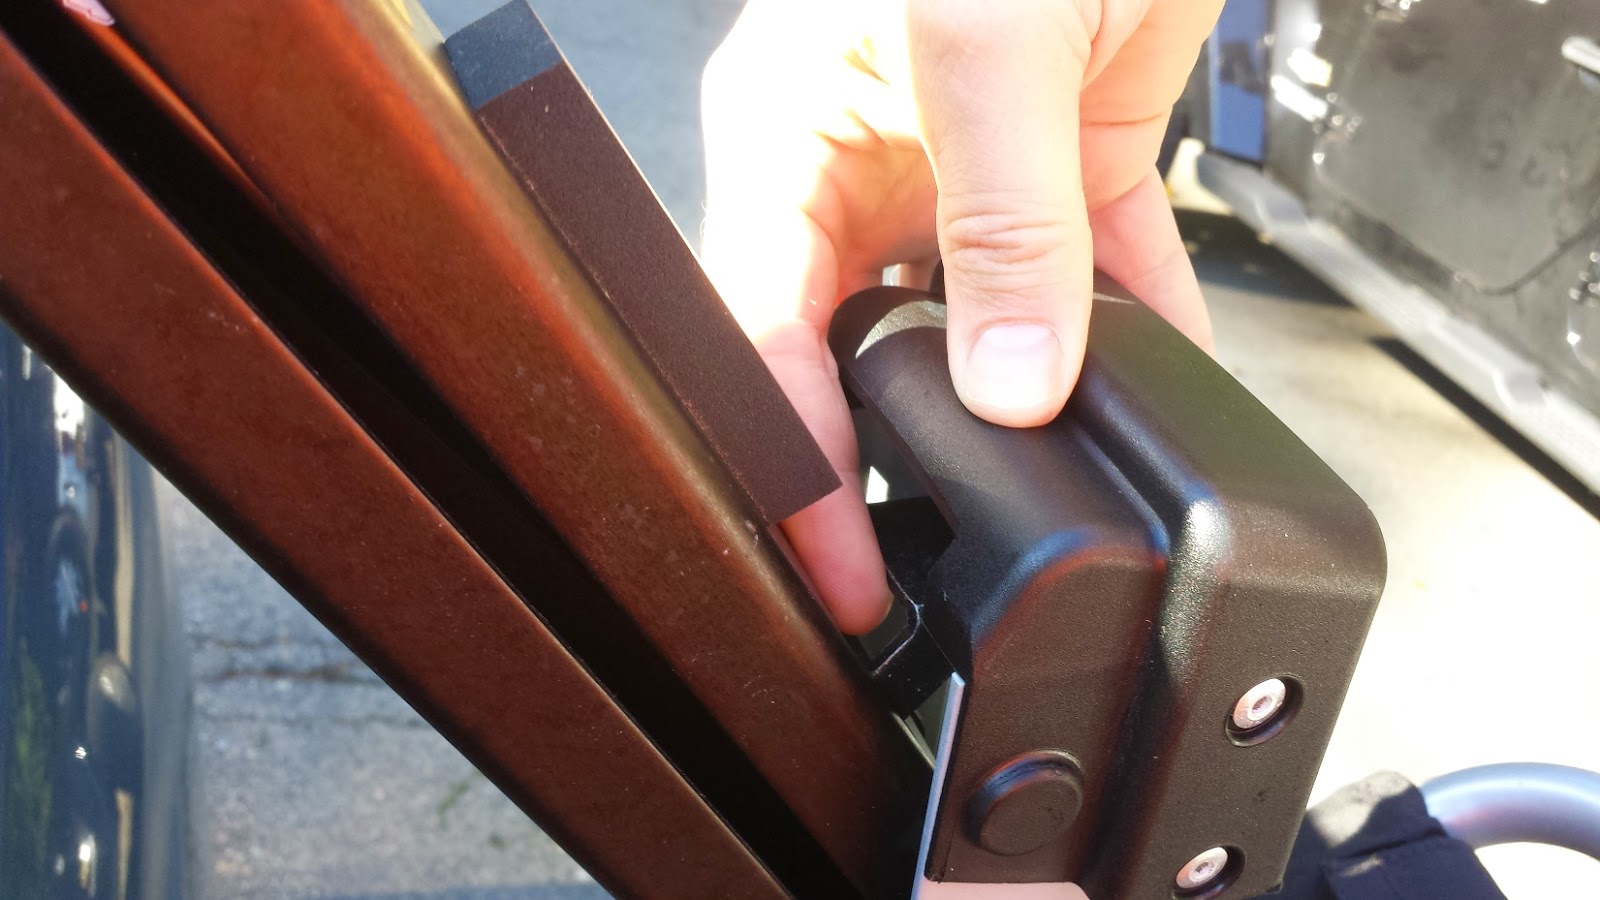
2. Next is a major TIP for those who own or are considering the Hullavator. If you have trouble bending way down to squeeze the two handles (to unlock the swing arms prior to raising them up once your boat is strapped in) I discovered an alternate method through trial-and-error. You can instead simply stick your finger at the top of the swing-arm (see photos) and pull up on the metal claw that "locks" the arm down. Voila - the arms are unlocked now and you can raise the boat to the roof. (I'd initially rigged a rope across the handles that I could step on with my foot to release, but unlocking the metal claws from above is far easier).
 |
| Alternate way to release Hullavator when in "down/extended" position |
 |
| Pull up on metal claw |
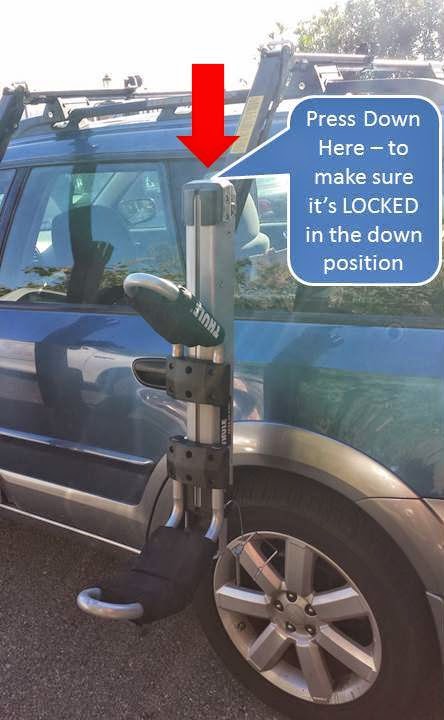
3. To prevent the swing arms from swinging up (violently) when you remove the boat, just make sure you press down on the tops of both swing arms firmly once the boat is lowered until you hear a "click". Then they're locked in the down position. This is pretty key.
 |
| Make sure it's LOCKED down |
4. Removing the Hullavator isn't hard - in the up position (arms retracted on top of cross bars), unlock the swing-arm and tip it up (so it's vertical but not extended/lowered) and pull it out (extend the swing arm) just an inch or two, then yank out the removable pin with your free hand. The swing arm stays put in the vertical position resting on the cross-bar (but you must keep a hand on it). Then just lift the unit up and off the cross-bar with two hands. It's pretty heavy - no way around that. The Hullavator's mounting bracket stays permanently fixed to the cross-bar.
 |
| To Remove Hullavator from Crossbars |
5. Regarding the problem of rotating arms (if you have Yakima bars) no way around that really either - but it's not a major problem. Just make sure you realign the swing arms so they're roughly parallel before you cinch down your boat straps and raise your boat. Pretty easy to do.
6. On the road noise issue - no way around it, but it's not too bad. I once had my rubberized kayak Lasso lock thing on my boat and mysteriously the squeaking stopped. There is probably an easy way to fix it but the noise doesn't bother me.
So that's it - the downsides to the Hullavator are mostly minor and the upsides are pretty substantial. The product is expensive ($500+) so it wouldn't be the first product I'd try if I needed solo boat loading help. On the other hand, it might save wear-and-tear on your back/shoulders over the years so you might consider getting one even if you don't absolutely need it.
I considered the various other products out there - none did much more than the Yakima Boatloader (Thule Outrigger) so I didn't buy them. For those with sedans, the Thule Glide&Set or Yakima's Hully Rollers work well I'm told, in combination with a blanket to protect your car's trunk. Kari-Tek (a UK company) has the Easy Load Roof Rack which I saw in Wales. While it's a great product, it's primary benefit is loading/lifting multiple boats at a time and it has no hydraulic assist. Worthwhile checking out though if you often load multiple boats.
